Print Version & Score Card – WOM Standards & Details AFL WOM Nov15.3A,B
WOM Nov 15.3A
Find a 1 Rep Max Snatch
Time Cap is 5 minutes
Then there is a 1 min transition and at 6 min NOV 15.3B Starts…
WOM NOV 15.3B
Complete 21-15-9-6-3 of:
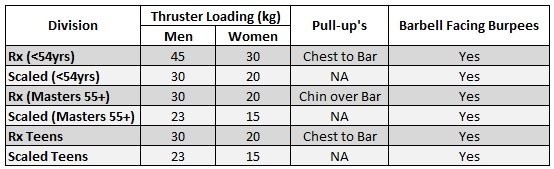
Thrusters (45kg/30kg)
C2B Pull-ups
BB Facing Burpees
Time Cap is 15 min
Note: Both WOM’s must be completed within the same 21 minutes
*Loading/Scaling variations are indicated below for the different divisions
Description WOM NOV 15.3A
This workout begins with the athlete standing behind an empty barbell on the floor with all the necessary plates and collars to be used. At the call of “take your marks”, “get set”, “go”… the athlete may start loading the barbell and fasten the collars/spring for the first attempt. Before any lift, the athlete must clearly state the weight to be attempted and must apply the collars/spring. The smallest plates that you can use are 0.5kg. The number of attempts that can be made are unlimited.
Your score will be the weight (kg’s) that you successfully snatch. You will also be asked to record your body weight (kg) for the tie breaker. The same barbell must be used for both NOV WOM 15.3A and 15.3B and they must be both be completed in the allocated 21 minutes (Time Cap of 5 min and 15 min respectively, with a 1 min transition). If you choose to redo any portion of this WOM, you need to redo 15.3A and 15.3B and re-submit both your new scores. Body weight will be used as a tiebreak method.
From 5th minute to the start of the 6th min, the athlete has 1 minute to load the Barbell to the specified load for Nov 15.3B
Tiebreak WOM Nov 15.3A
In this workout, we will be using a tiebreak method to separate athletes on equal reps. If there is a tie at the exact same weight, the lighter athletes will rank above the heavier athletes. You will be asked to submit your body weight when you submit your score. The weight will be used to break the tie for athletes on equal reps, divided into 5 kg classes i.e. 70-74,99kg; 75-79,99kg; 80-84,99kg; 85-79,99kg, etc.
It is the Athletes responsibility to ensure that their body weight (kg) is correctly reported when submitting the scores. If an athlete does not submit their body weight they will still have a valid score for Workout NOV 15.3A, but they will be ranked lower than athletes that completed the same amount of reps but who submitted their body weight. This tiebreak will also be used for the Scaled options.
Equipment
- Barbell
- Collars/Spring
- Bumper plates and Fractionals (for 15.3A & B)
- Bar of appropriate height
For each WOM, be sure the athlete has adequate space to safely complete the workout. Clear the area of all extra obstructions, people, animals or equipment.
The official weight is in kilograms.
Description WOM NOV 15.3B
This workout begins at the start of the 6th minute with the athlete standing at the barbell loaded to the correct load. At the start of the 6th minute the athlete may clean the barbell and begin the thruster’s. After 21 reps are completed the athlete moves onto the chest to bar pull-up’s. After 21 chest to bar pull-up’s are completed then the athlete moves onto the barbell facing burpees. The athlete then continues by completing 15 reps on each movement, then 9, then 6, and lastly 3. Note that scaled divisions will not complete any pull-up’s.
Your score will the time taken as the last barbell facing burpee is completed. If you do not finish the workout by 21 minutes (i.e. the 15 minute time cap on Nov 15.2B) then your score will be the time cap (15 minutes) plus 1 sec for every rep missed. For example, if an Rx’d athlete still had the round of 3’s to complete at the time cap, you are 9 reps short of completing the WOM and therefore your time will be 15 minutes plus 9 sec’s (i.e. 15:09).
There will be no tiebreaker for this WOM.
Video Submission Standards
Prior to starting the WOM, film the barbell plates, bumpers, collars/spring and fractionals to be used for both Nov 15.1A and 15.1B. Show that your feet do not touch the ground when hanging from the pull-up bar. In order to accurately show the performance, all video submissions should be uncut and unedited. Your judge and a stopwatch (or visible timer) must be in the frame throughout the entire workout. Shoot the video from an angle so that all the exercises can be clearly seen to meet the movement standards in this document or the WOM instruction video.
WOM Nov 15.3A Variations
All divisions will have 5 minutes to find a 1 rep max Snatch
WOM Nov 15.3B Variations
Rx’d
(Rx’d Men, Masters Men 40-44, Masters Men 45-49, Masters Men 50-54, Rx’d Women, Masters Women 40-44, Masters Women 45-49, Masters Women 50-54)
Complete 21-15-9-6-3 of:
Thruster (45kg/30kg)
C2B Pull-up
BB Facing Burpees
Time Cap is 15 min
Note: Both WOM’s must be completed within the same 21 minutes
SCALED
(Scaled Men, Scaled Masters Men 40-44, Scaled Masters Men 45-49, Scaled Masters Men 50-54, Scaled Women, Scaled Masters Women 40-44, Scaled Masters Women 45-49, Scaled Masters Women 50-54)
Complete 21-15-9-6-3 of:
Thruster (30kg/20kg)
BB Facing Burpees
Time Cap is 15 min
Note: Both WOM’s must be completed within the same 21 minutes
MASTERS (55 yrs +)
(Masters Men 55-59, Masters Men 60+, Masters Women 55-59, Masters Women 60+)
Complete 21-15-9-6-3 of:
Thruster (30kg/20kg)
Chin over Bar Pull-up
BB Facing Burpees
Time Cap is 15 min
Note: Both WOM’s must be completed within the same 21 minutes
SCALED MASTERS
(Scaled Masters Men 55-59, Scaled Masters Men 60+, Scaled Masters Women 55-59, Scaled Masters Women 60+)
Complete 21-15-9-6-3 of:
Thruster (23kg/15kg)
BB Facing Burpees
Time Cap is 15 min
Note: Both WOM’s must be completed within the same 21 minutes
TEENS
(Teen Boys 14-15, Teen Boys 16-17, Teen Girls 14-15, Teen Girls 16-17)
Complete 21-15-9-6-3 of:
Thruster (30kg/20kg)
C2B Pull-up
BB Facing Burpees
Time Cap is 15 min
Note: Both WOM’s must be completed within the same 21 minutes
SCALED TEENS
(Scaled Teen Boys 14-15, Scaled Teen Boys 16-17, Scaled Teen Girls 14-15, Scaled Teen Girls 16-17)
Complete 21-15-9-6-3 of:
Thruster (23kg/15kg)
BB Facing Burpees
Time Cap is 15 min
Note: Both WOM’s must be completed within the same 21 minutes
In Summary:
MOVEMENT STANDARDS
Snatch
In this workout any style of snatch is permitted. A muscle snatch, a power snatch, a squat snatch or a split snatch! If a split snatch is used, the feet must be brought together while the weight is overhead before the bar is lowered from the overhead position for the rep to count.

Start Position
The barbell must start with both plates in contact with the ground.

End Position
The snatch ends with the knees, hips, and arms fully extended and in a straight line with the bar locked out overhead with the bar over the middle of the body when viewed from the side.
The athlete may not pause at any point in the pull of the snatch. A hang snatch will therefore be a no rep.
If the athlete fails to clearly demonstrate control at the top of the movement with the knees, hips, and arms fully extended and in a straight line with the bar locked out overhead with the bar over the middle of the body, those reps will not count.
Thruster
The 1st rep starts with both plates in contact with the floor and the barbell is taken into the front rack position. A squat rack or any other apparatus may not be used to get the bar to the front rack position!

Start Position
With the bar in the front rack position, in one motion the athlete squats until the crease of the hip passes below the top of the knee.

End Position
From the bottom position, the athlete squats up in one motion and the thruster ends with the bar locked out overhead with the arms, shoulders, hips and legs in a straight line. The bar must be locked out overhead over the middle of the body when viewed from the side.
A squat clean thruster may be performed on the first rep. If the athlete pauses/stops on the thrusters, those reps will not count. If an athlete fails a rep, they must complete the full thruster from hip crease below the top of the knee for the rep to count.
Chest to Bar Pull-up
Any style of pull-up is allowed (i.e. strict pull-up / gymnastics pull-up / butterfly pull-up).
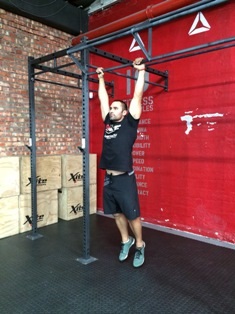
Start Position
The athlete must start from a hanging position with the arms fully extended and the shoulders fully flexed in the overhead position. The feet may not touch the floor.

End Position
The chest to bar pull-up ends with the bar clearly making contact on the chest below the collar bone.

Chin Over Bar Pull-up End Position
For Masters Rx 55 yrs+ – The start position for the chin over the bar pull-up is the same as that for the chest to bar pull-up but ends when the athlete has raised the chin above the horizontal plane of the pull-up bar.
Note: Scaled Divisions – No Pull-up’s will be performed!
BB Facing Burpee

Start Position
The burpee starts with the athlete facing the barbell and lying flat on the floor with the thighs and chest touching the ground. The athlete then gets up and uses a double foot take-off to jump over the barbell.

End Position
The rep ends when the athlete clears the barbell. If the athlete fails to clear the barbell, the athlete needs to simply re-attempt the jump-over and does not need to lie flat on the floor before re-attempting the jump-over. The athlete may not leave the ground with 1 foot – a double foot take-off must be used.

If you are not directly facing the barbell it is a NO REP!
For the reps to count you must complete the burpee facing the barbell! Changing your body orientation to an angle or parallel with the bar will result in a no rep.
Print Version & Score Card – WOM Standards & Details AFL WOM Nov 15.4
WOM NOV 15.4
Complete as many rounds and reps as possible in 12 minutes of:
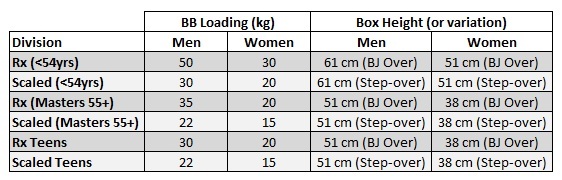
12 Box Jump Overs (61cm/51cm)
9 Shoulder to Overhead (50kg/30kg)
6 Sumo Deadlift High-Pull (50kg/30kg)
Tie Break Time – Time of last completed round
Description WOM NOV 15.4
This workout begins with the athlete standing next to the box. At the call of “take your marks”, “get set”, “go”… the athlete will start the box jump overs. After 12 box jump overs, the athlete will complete 9 shoulders to overhead, and then 6 sumo deadlift high-pulls (SDHP). After the last SDHP, the athlete will move back to the box jumps overs to begin the next round. Take note for the box jump overs – the Rx’d division is not allowed to step up, although the athlete may step down the other side.
Your score will be the total number of repetitions completed by the 12-minute time cap. You will enter your result by the total number of reps completed plus your tiebreak time (see below).
Tiebreak WOM Nov 15.4
In this workout, we will be using a tiebreak method to separate athletes on equal reps. At the end of each set of SDHP, time should be marked. When you submit your final result, your score will be the number of reps completed. There will be another field in which you will enter the elapsed time at which you completed your last rep of SDHP on the last round.
For example, a male athlete finishes 5 complete rounds (135), plus an additional 5 reps (140) on the box jumps. He finished his 5th round at 11:40. In this case he will enter 11:40 as his time in the tiebreak field. He would then be ranked above someone who got 140 reps but with a tiebreak time of 11:45, but below someone with 140 reps and a tiebreak time of 11:35. The scaled divisions will also use this tiebreaker.
Note: All tiebreak times must be reported in elapsed time. If you decide to use a countdown timer, you must first convert to elapsed time before reporting your score. We therefore suggest that you set your clock to count up instead of counting down. If an athlete does not submit their tiebreak time for Workout NOV 15.4, they will be ranked lower than athletes that completed the same amount of reps but who submitted their tie break time. There will also be a tiebreak for the Scaled options.
Equipment
- Box Jump
- Barbell
- Collars/Spring
- Bumpers/Fractionals
For each WOM, be sure the athlete has adequate space to safely complete the workout. Clear the area of all extra obstructions, people, animals or equipment.
*The official weight is in kilograms.
Video Submission Standards
Prior to starting the WOM, film the measuring of the height of the box, as well as the bumper/fractional plates, so the height and loads can be seen clearly. In order to accurately show the performance, all video submissions should be uncut and unedited. Your judge and a stopwatch (or visible timer) must be in the frame throughout the entire workout. Shoot the video from an angle so that all the exercises can be clearly seen to meet the movement standards in this document and the WOM instruction video.
WOM Nov 15.4 Variations
Rx’d
(Rx’d Men, Masters Men 40-44, Masters Men 45-49, Masters Men 50-54, Rx’d Women, Masters Women 40-44, Masters Women 45-49, Masters Women 50-54)
Complete as many rounds and reps as possible in 12 minutes of:
12 Box Jump Overs (61cm/51cm)
9 Shoulder to Overhead (50kg/30kg)
6 Sumo Deadlift High-Pull (50kg/30kg)
Tie Break Time – Time of last completed round
*The Box Jump Overs – the Rx’d athlete may not step-up but may only step-down
SCALED
(Scaled Men, Scaled Masters Men 40-44, Scaled Masters Men 45-49, Scaled Masters Men 50-54, Scaled Women, Scaled Masters Women 40-44, Scaled Masters Women 45-49, Scaled Masters Women 50-54)
Complete as many rounds and reps as possible in 12 minutes of:
12 Box Step Overs (61cm/51cm)
9 Shoulder to Overhead (30kg/20kg)
6 Sumo Deadlift High-Pull (30kg/20kg)
Tie Break Time – Time of last completed round
*The Box Step Overs – the Scaled athlete may step-up and also step-down
MASTERS (55 yrs +)
(Masters Men 55-59, Masters Men 60+, Masters Women 55-59, Masters Women 60+)
Complete as many rounds and reps as possible in 12 minutes of:
12 Box Jump Overs (51cm/38cm)
9 Shoulder to Overhead (35kg/20kg)
6 Sumo Deadlift High-Pull (35kg/20kg)
Tie Break Time – Time of last completed round
*The Box Jump Overs – the Rx’d athlete may not step-up but may only step-down
SCALED MASTERS
(Scaled Masters Men 55-59, Scaled Masters Men 60+, Scaled Masters Women 55-59, Scaled Masters Women 60+)
Complete as many rounds and reps as possible in 12 minutes of:
12 Box Step Overs (51cm/38cm)
9 Shoulder to Overhead (22kg/15kg)
6 Sumo Deadlift High-Pull (22kg/15kg)
Tie Break Time – Time of last completed round
*The Box Step Overs – the Scaled athlete may step-up and also step-down
TEENS
(Teen Boys 14-15, Teen Boys 16-17, Teen Girls 14-15, Teen Girls 16-17)
Complete as many rounds and reps as possible in 12 minutes of:
12 Box Jump Overs (51cm/38cm)
9 Shoulder to Overhead (30kg/20kg)
6 Sumo Deadlift High-Pull (30kg/20kg)
Tie Break Time – Time of last completed round
*The Box Jump Overs – the Rx’d athlete may not step-up but may only step-down
SCALED TEENS
(Scaled Teen Boys 14-15, Scaled Teen Boys 16-17, Scaled Teen Girls 14-15, Scaled Teen Girls 16-17)
Complete as many rounds and reps as possible in 12 minutes of:
12 Box Step Overs (51cm/38cm)
9 Shoulder to Overhead (22kg/15kg)
6 Sumo Deadlift High-Pull (22kg/15kg)
Tie Break Time – Time of last completed round
*The Box Step Overs – the Scaled athlete may step-up and also step-down
In Summary:
MOVEMENT STANDARDS
Box Jump Overs

Start Position
The box jump over starts with the athlete next to the box. The athlete jumps up onto the box with a double foot take-off. The athlete can start at any orientation to the box (i.e. box facing, 90 degrees to the box or at any other angle)


Land on or End Position
Clear the Box
The box jump over ends when the athlete clears the box. The athlete can do this by landing on the box and the stepping off or jumping off the other side. The athlete can also do this by jumping right over the box and clearing it. Rebounds are allowed. The athlete does not need to achieve full extension on top of the box for the rep to count.
If the athlete touches the box with his/her hands and or vaults over the box in any manner, these reps will not be counted.
For the Rx’d division no stepping up is allowed, although you may step down the other side.
Scaled Divisions – The athlete may perform the box jump over in the same manner as the Rx’d athlete or they could step-up onto the box and step-off the other side. Full extension does not need to be attained on top of the box. The scaled athlete may also start at any orientation to the box (i.e. box facing, 90 degrees to the box or at any other angle).
Shoulder to Overhead
Any shoulder to overhead motion can be used, including a strict press, a push press, a push jerk and a split jerk. If a split jerk is used, the feet must be brought together before the bar is lowered from the overhead position for the rep to count.
Start Position
For the shoulder to overhead movement, the athlete must start with the barbell on the ground and cannot take the barbell from a rack or from blocks.
The reps starts with the bar in the front rack position with the body in full extension with the knees, hips and shoulders in a straight line.


End Position End Position
(side view) (front view)
The repetition ends when the barbell is locked out overhead over the middle of the body, with the knees, hips, and arms fully extended and in a straight line. The bar must be over the middle of the body when viewed from the side. If the athlete fails to clearly demonstrate control at the top of the movement with the knees, hips, and arms fully extended and in a straight line with the bar locked out overhead, those reps will not count.
Sumo Deadlift High-pull

Start Position
The sumo deadlift high-pull starts with both plates in contact with the ground and the arms and grip positioned between the legs.
End Position
The sumo deadlift high-pull ends with the barbell breaking the horizontal plane of the collar bone with the knees, hips and shoulders in a straight line and the elbows clearly above the barbell horizontal plane.
No deliberate bouncing of the barbell is allowed. A sumo deadlift position must be used and reps will not be counted if the arms are not between the legs. If the elbows do not remain above the horizontal plane with the barbell throughout the motion, those reps will not count.